emsCharts has a Bio-Surveillance module that helps track outbreak parameters in a specific area. With this module, you can identify areas that have high concentrations of particular attributes, such as symptoms, impressions, or medical categories. Tracking these attributes helps you identify suspected outbreaks of diseases, such as the Coronavirus Disease 2019 (aka, COVID-19).
Let’s go over how you might configure and use emsCharts to track the COVID-19 outbreak.
Table of Contents
The Geocoding module in emsCharts assigns GPS coordinates to locations. The GPS coordinates enable a couple of features including Bio-Surveillance and Spatial Analysis. For a limited time, ZOLL will allow all services to opt into Geocoding, which will also enable Bio-Surveillance and Spatial Analysis.
To opt into Geocoding:
Log into emsCharts as a user with system administration privileges.
Go to Configuration under Service > the Account tab > Scroll down to Geocoding.
Under Geocoding, click the button that enables the demo service.
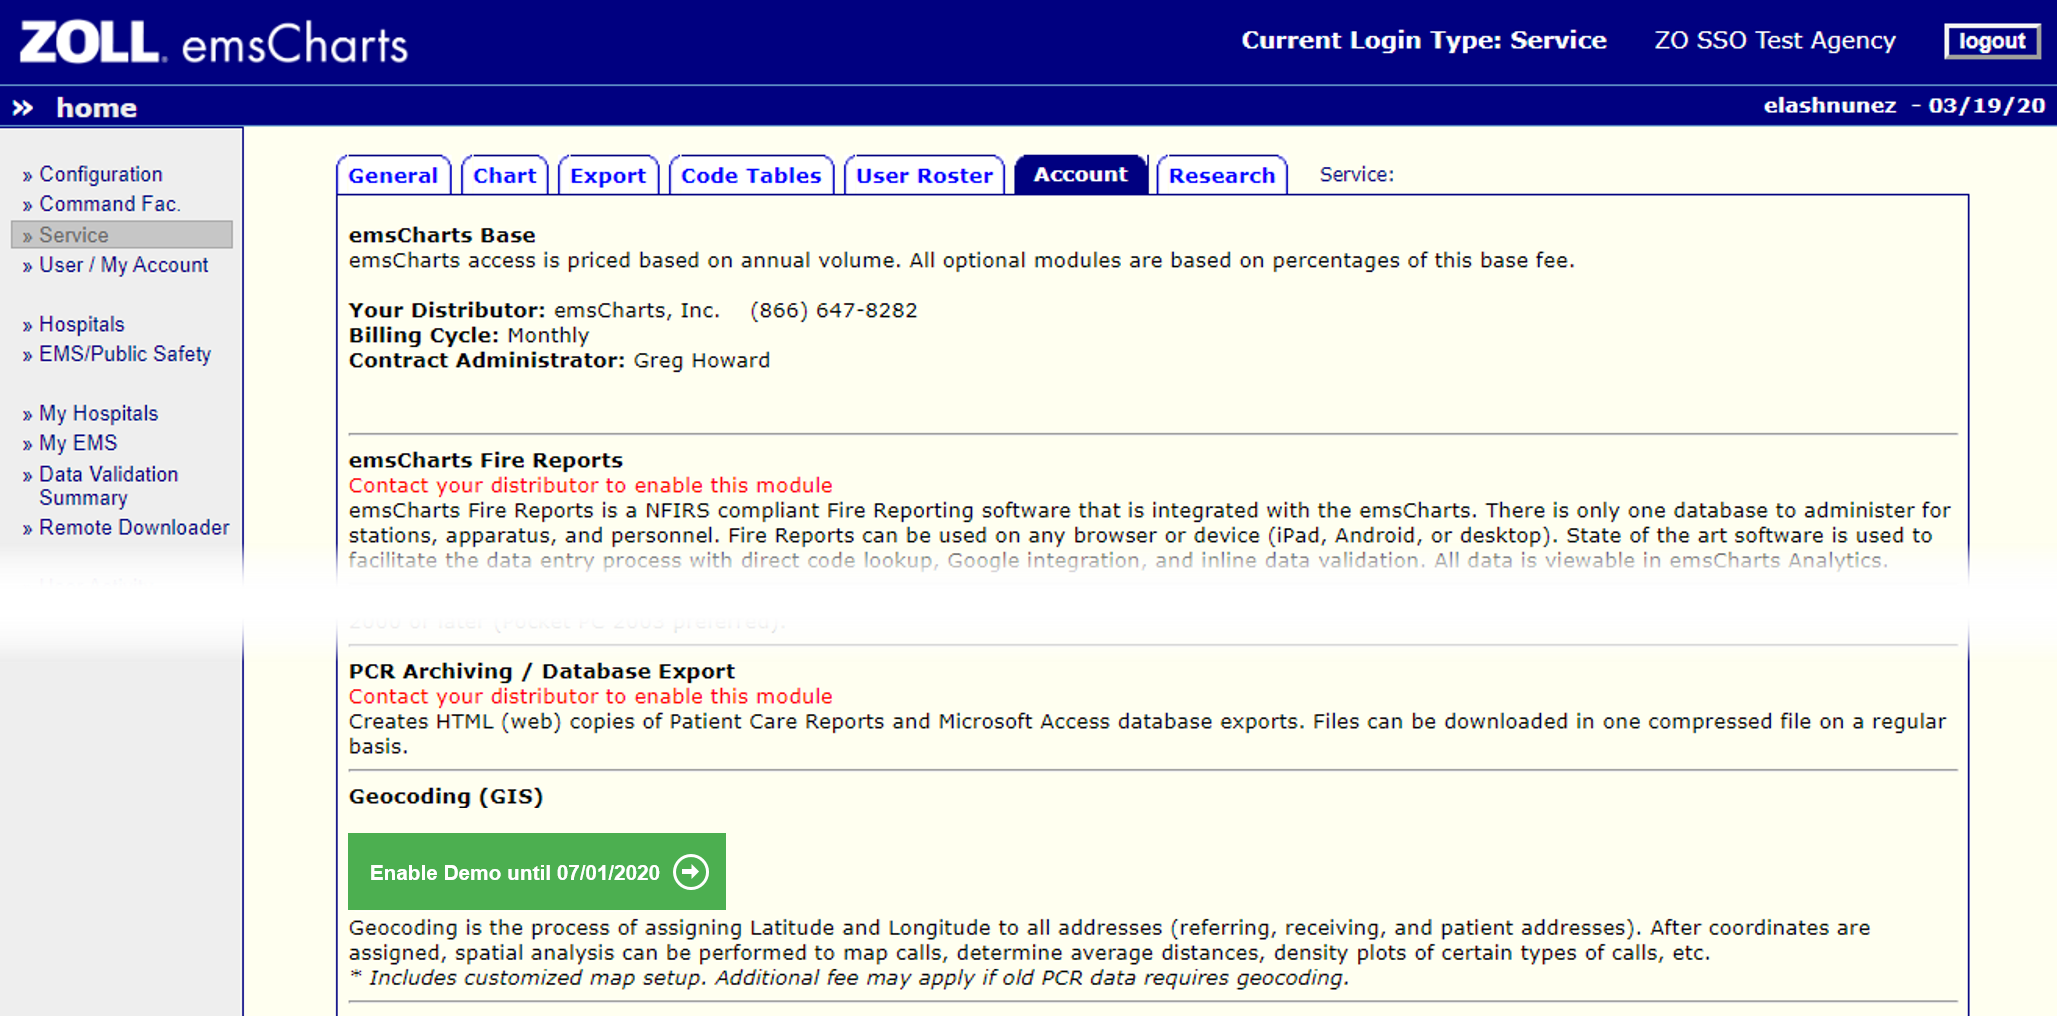
ZOLL has offered Geocoding to all customers so that you can use bio-surveillance during the COVID-19 outbreak. Geocoding also comes with the capability to identify the exact coordinates of most locations using Google Maps, auto-calculate mileage for billing, and map data using the Spatial Analysis reporting feature.
If you’d just like to use Bio-Surveillance only, follow the next section to learn how. If you’d like to take advantage of Spatial Analysis, consult the section after Bio-Surveillance. You can learn how to use the other geocoding features under Geocoding.
Bio-Surveillance alerts are a tool you can use in emsCharts to define rules for outbreak parameters. After you define the rules, emsCharts emails alerts when those criteria are met in submitted PCRs.
To set up Bio-Surveillance:
Go to Configuration > Service > Code Tables tab. You must have software admin permissions to access the code tables you need to set up bio-surveillance.
Click in the Code Table drop-down and type Bio Surveillance.
Select the Bio-Surveillance code table.
Fill in the code table. We’ll explain the fields below.
You can also set up Bio-Surveillance at the Region level, following the same process. |
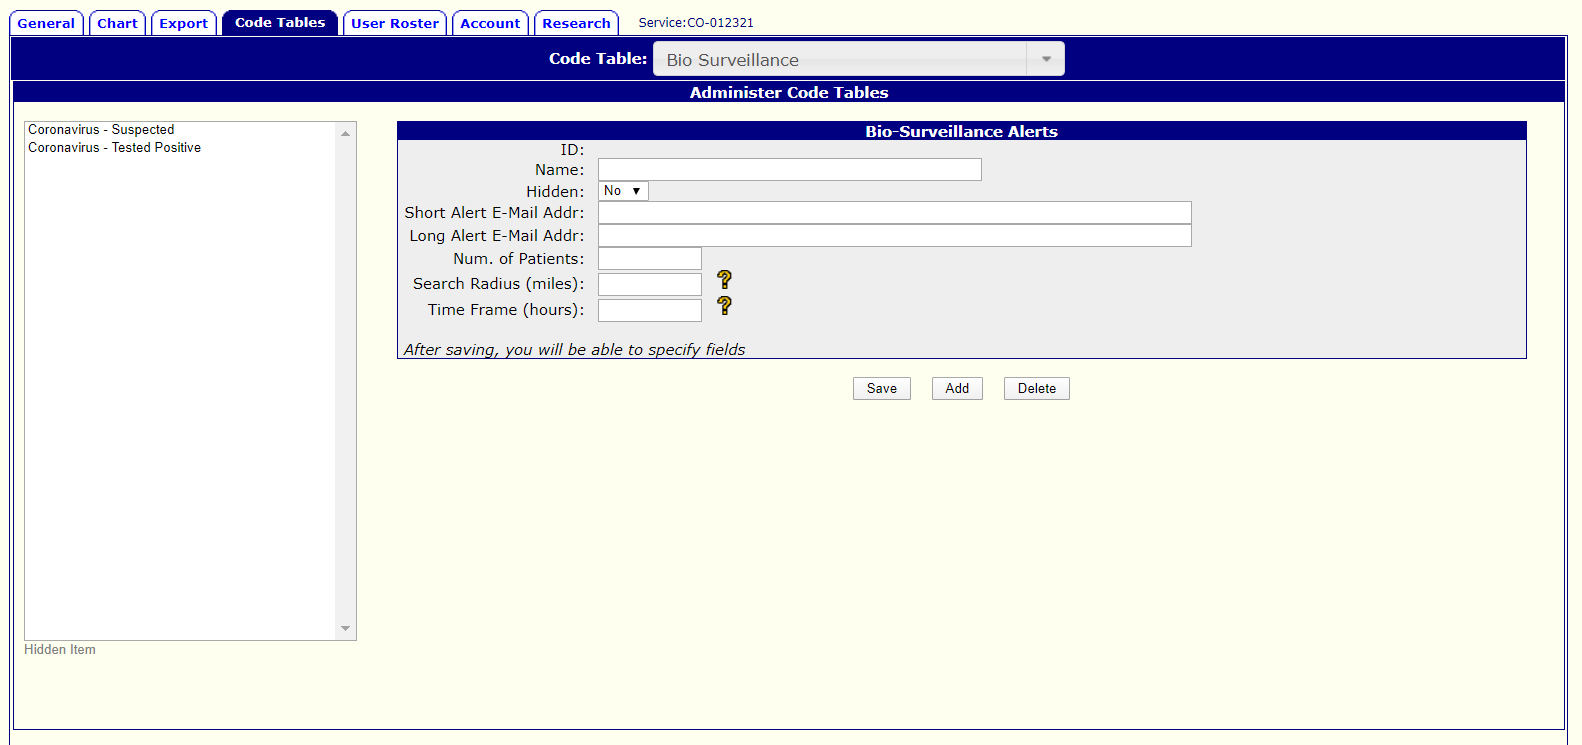
Name is simply the name you’ll want to give this alert. You can see that we have two alerts called Coronavirus to the left. The name will be in the subject of the email alert, so you’ll want to choose something that gives you an indication of the alert.
Hidden disables the alert without removing it from the system.
Enter the email address of the person to whom you’d like to send a short email. The short email communicates the criteria achieved to trigger the alert. It also shows the number of patients affected.

Example short email alert
Enter the email address of the person, or distribution group, to whom you’d like to send a long email alert. The long email communicates information about the outbreak parameter you set, off of the patient who first meets the criteria.

Example long email alert
You can see in this example, the alert was sent concerning the first patient who met the criteria. Because they are the first, the distance from them is 0.000: they’re ground zero.
The long email includes patient details. From these details, you can easily copy the PRID into emsCharts to quickly find the associated PCR.
Enter the number of patients before the alert is triggered. The long email alert will compile information about all of the patients before the trigger number, but will only send the email when the number of affected encounters is hit.
Enter the number of miles around the initial patient you’d like to trigger the email alert. The email alert will send when the number of patients within the radius you designate is reached.
Enter a number between 0 and 200 miles. If a number is not entered, the search radius of 0 will be used, effectively disabling the alert.
Enter the number of hours during which you’d like to collect the data. Enter a number between 0 and 336 hours (14 days). If you leave the field empty, the time frame of 0 will be used, effectively disabling the alert.
Save after you’ve filled out the table.
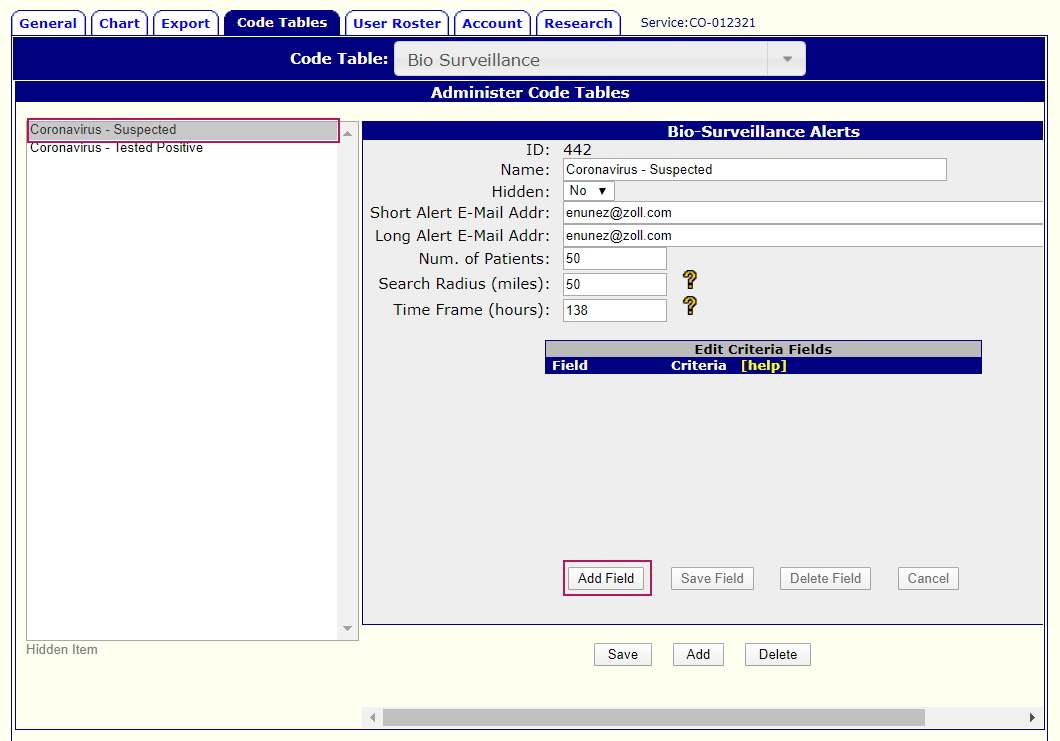
Once you’ve saved the alert, the Edit Criteria Fields section will pop up. To set the criteria for triggering a bio-surveillance alert, click
the name of the table you just created in the left column and then
the Add Field button.
We’ll go over how ZOLL recommends using PCR data to track COVID-19 before showing how to complete the Bio-Surveillance Alerts table.
You can trigger alerts based off of any fields, or fields combined, in the PCR. For COVID-19 specifically, you may want to trigger alerts in the following ways:
Impressions. Based on NEMSIS recommendations, emsCharts has added two items to the Impressions pick-list: Coronavirus (general) and Coronavirus (suspected). Your users can select these values from the impressions pick-list in the PCR. And, when they do, you can set the criteria here to trigger an alert.
Symptoms. You can also trigger an alert when all symptoms of coronavirus are selected in the PCR. You may need to add symptoms to the pick-list, especially if your agency doesn’t track symptoms like cough. We’ll tell you how to add symptoms to this pick-list below.
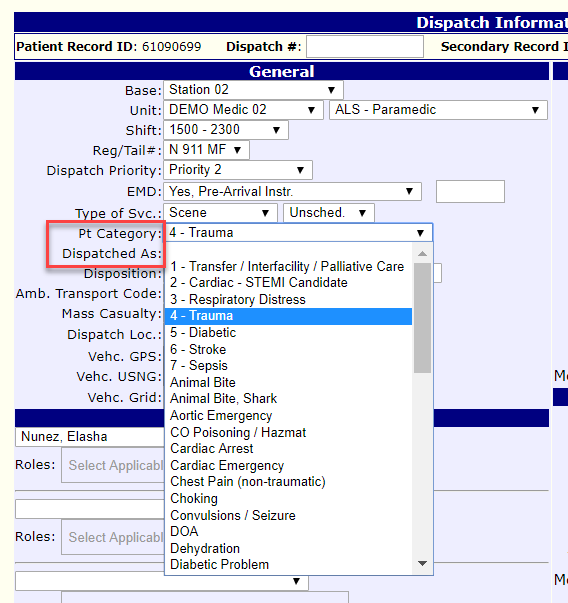
Medical Category. You can also add anything related to the coronavirus to the medical category and trigger an alert off of the selection in the PCR. Like symptoms, we’ll tell you how to add to the medical category pick-list.
The following sections explain how to set up criteria for each of these three pick-lists.
Follow these steps to set the criteria based off impressions:
Click on Category and select Page 2 - CC/HPI.
Click Common next to the Column field.
Select Impressions or Impressions (list).
Set the Operator to Equals.
Click the magnifying glass next to Criteria.
Select one of the Coronavirus items: general or suspected.
Similarly, you can set the criteria based off of symptoms. For symptoms, you may want to set more than one criteria. To set more than one, you merely add another field. emsCharts will send an alert when all symptoms are selected in a submitted PCR.
Click on Category and select Page 2 - CC/HPI.
Click Common next to the Column field.
Select Injury Symptoms.
Set the Operator to Equals.
Click the magnifying glass next to Criteria.
Select one of the symptoms.
To add more symptoms, click Add Field and repeat this process for each additional symptom you set.
If you need to add symptoms to the pick-list, follow these instructions:
Go to Command Fac. and then the Code Tables tab (You must have Command permissions.).
Click in the Code Table drop-down and type Symptom.
Select the Complaint Symptom code table.
Add a symptom by clicking the Add button at the bottom.
Fill out the code table.
Save.
After you’ve added the symptom, go through the process of adding the symptom to the same Bio-Surveillance code table following the process above.
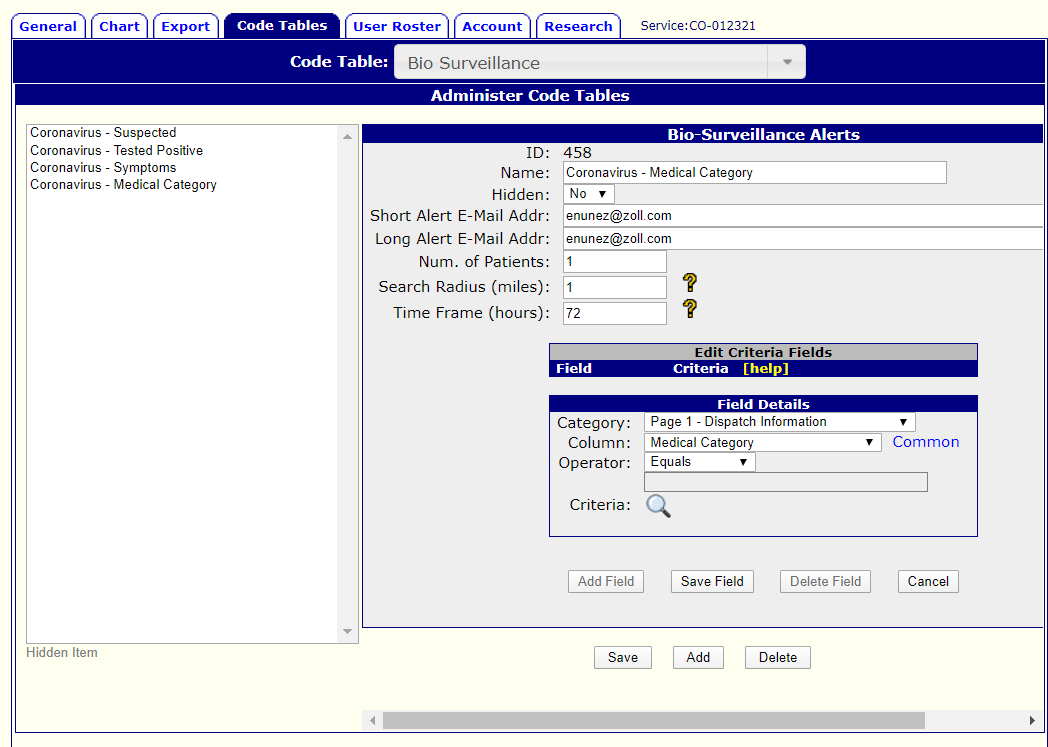
Similarly, you can set the criteria based off of medical category, as follows:
Click on Category and select Page 1 - Dispatch Information.
Click Common next to the Column field.
Select Medical Category.
Set the Operator to Equals.
Click the magnifying glass next to Criteria.
Select a medical category.
If you need to add to the medical category pick-list, follow these instructions:
Go to Command Fac. and then the Code Tables tab (You must have Command permissions.).
Click in the Code Table drop-down and type Patient Categories.
Select the Patient Categories / Dispatch As code table.
Fill out the code table.
Save.
After you’ve added the category, go through the process of adding the medical category to the same Bio-Surveillance code table following the process above.
Whereas the short email alert serves to merely alert you to the criteria match, you’ll get data to act off of in the long email alert.

From this email, you can copy the PRID number and paste it into the PRID search field to find this PCR. You may also use this information to reference against the map created using Spatial Analysis.
With Geocoding enabled, you’ll be able to map the PCR attributes that may indicate an outbreak. Currently, you can track attributes by the following:
Outcome
Medical Category
Impressions
Body System
Symptoms
Procedure Action
Custom Assessment
Below, we’ll explain how to set up Spatial Analysis and how to evaluate the results.
To be able to use Spatial Analysis, you first must geocode your base sites. To geocode your base sites, follow these instructions:
Go to Configuration under Service and then click the Code Tables tab.
Click in the Code Table drop-down and type Base Sites.
Select the Base Sites code table.
Click on the first base site in the list.
Make sure the full address for the base site is correct.
Scroll to the bottom.
Click the Re-Geocode link to obtain GPS coordinates for this base site.

Evaluate the precision of the results under Precision. The precision of the example below is ZIP.

ZIP means the GPS coordinates returned are those of the center of the zip code. Ideally, precision should be address, which means that geocoding found the exact location. Any other precision will describe the accuracy of the returned results.
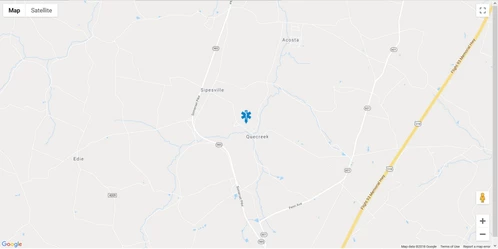
Once GPS coordinates have been found, you can view them on a map by clicking the Map link.
Finish geocoding all of your base sites following these instructions.
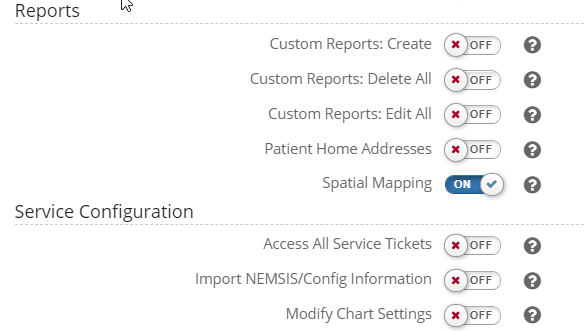
To access Spatial Analysis, first enable the permissions for your users, as follows:
Go to (Service) Configuration.
Click the Code Tables tab.
Type Security Roles and select the Security Roles code table.
Select the role you want to give access.
Turn on Spatial Mapping under the Report section.
Scroll to the bottom and select Update.
To evaluate COVID-19, or other parameters, visually using Spatial Analysis, follow these directions:
Go to Reports > Spatial Analysis > Click here to go to maps
Click Recent Calls
The map opens with Bases selected by default. When you click Recent Calls, you’ll be able to map various parameters, such as outcomes, medical category, impressions, and symptoms.
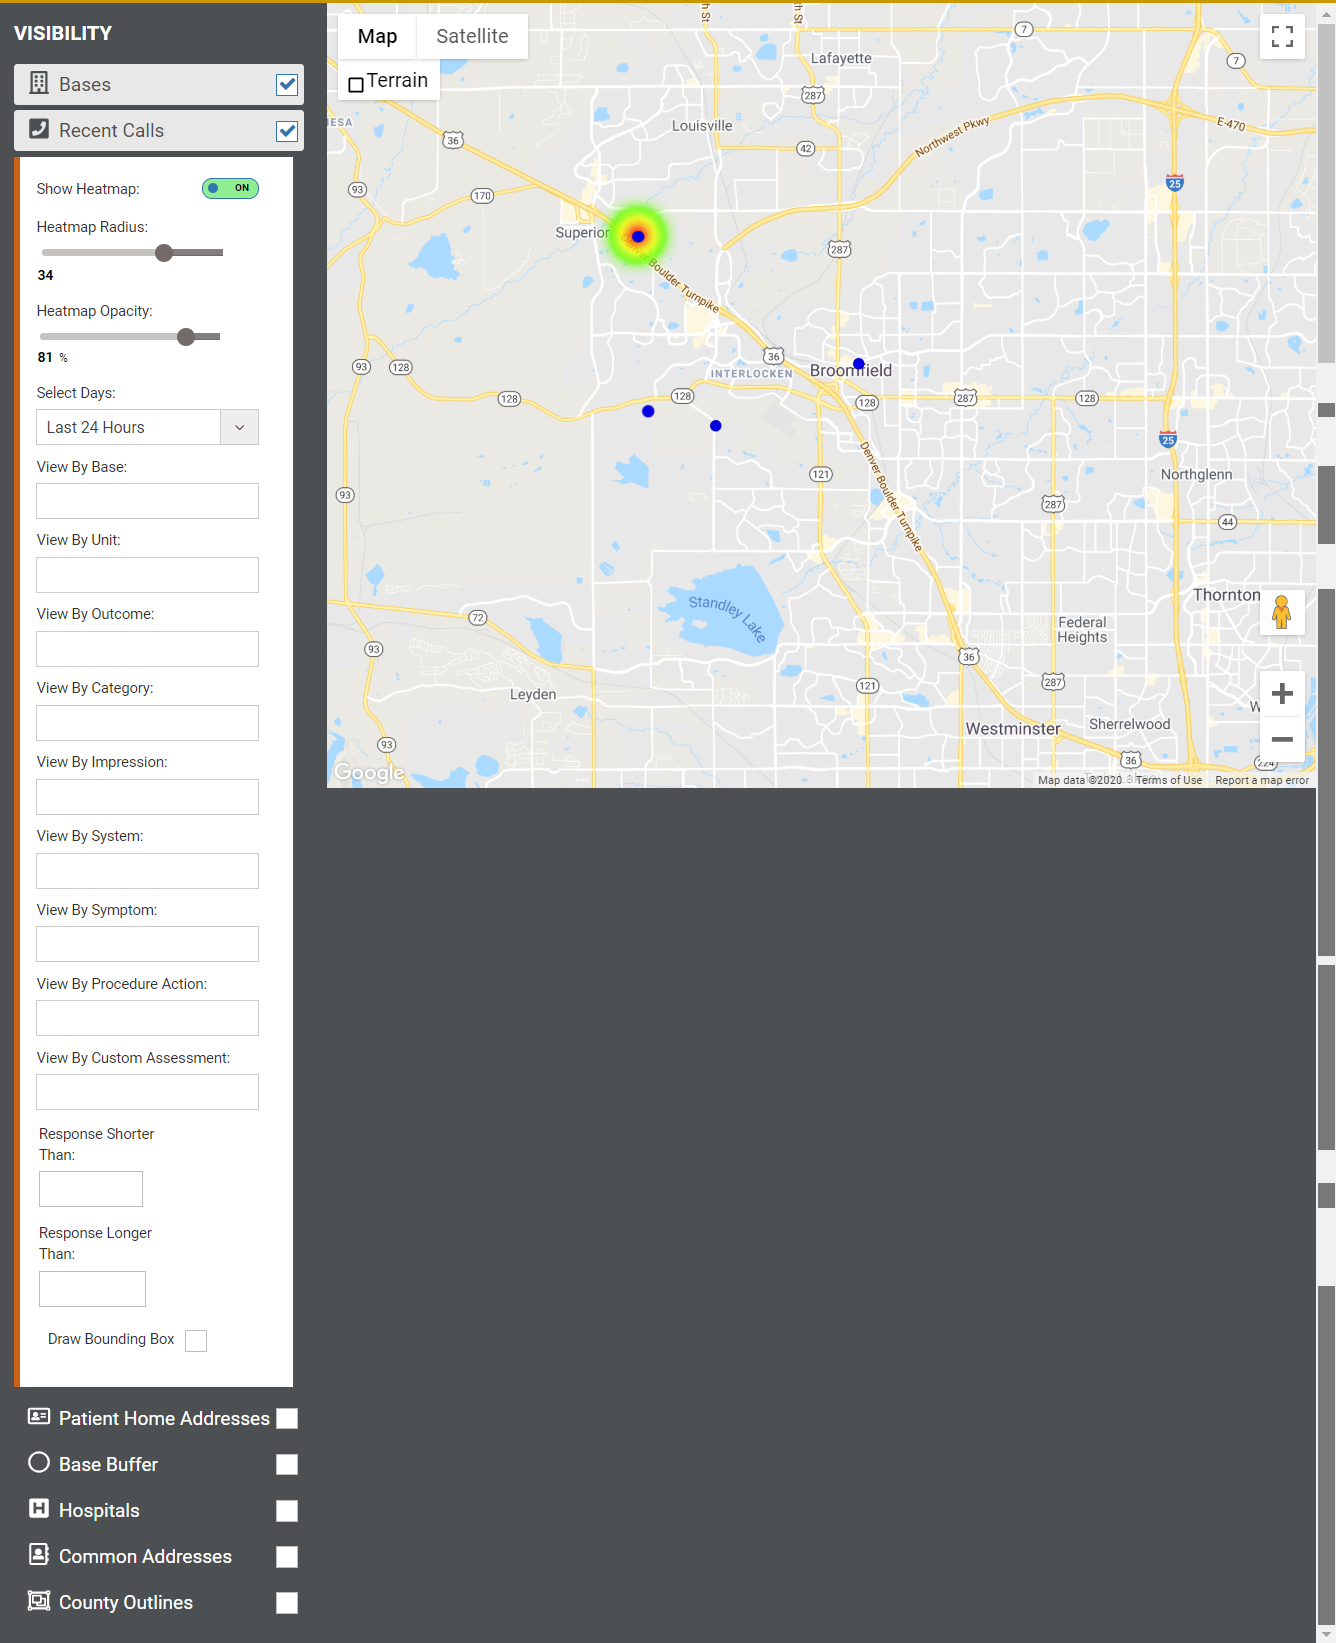
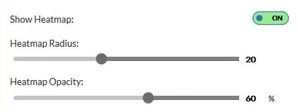
Heat map settings can be turned on and Radius and Opacity can be adjusted:
Note that this is an example map, with few PCRs completed. Your heat map will likely be more robust and quickly indicate concentrations of attributes that you select.
In addition to Bio-Surveillance and Spatial Analysis, you can use another feature of Geocoding during your trial run: auto-calculated mileage. To speed along auto-calculation, you can also geocode common addresses.
Auto-calculated mileage is a feature that calculates the distance for a trip based on GPS coordinates. The mileage is then sent in the NEMSIS file and Chart Summary for billing. You can set the mileage to calculate based on the shortest distance or the fastest route to comply with CMS.
To turn on auto-calculated mileage, follow these instructions:
Under Service, go to Configuration and then the Chart tab.
Go to Specialty / Odometer / Mileage.
Turn Calculate loaded mileage from GPS locations to Yes.
Notice that the Track GPS locations on Page 1 says Geocoding is enabled. GPS fields will display. This indicates that Geocoding is turned on. |
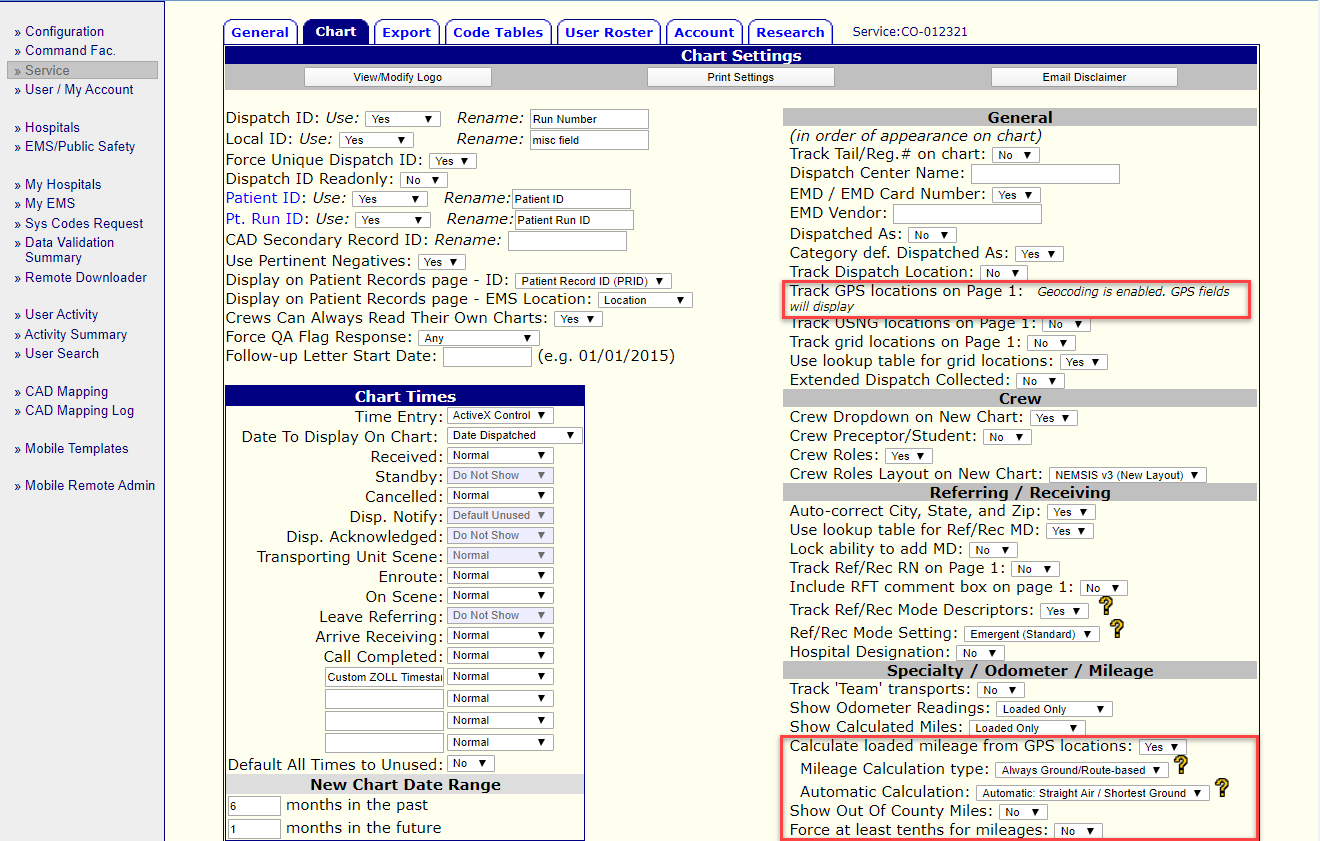
After you turn on auto-calculated mileage, choose how you’d like emsCharts to calculate the mileage.
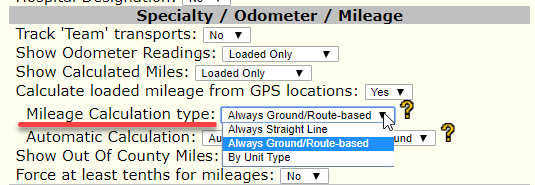
Under Mileage Calculation type, you can choose:
Always a Straight Line. This is the best setting for air transport agencies. It will calculate the straight line between the receiving and referring locations.
Always Ground/Route-based. This is best for ground-only agencies. It will calculate either the shortest distance or the fastest route, depending on the settings you select under Automatic Calculation.
By Unit Type. Select this type if you have both ground and air units. It’ll calculate the straight line for air units and the ground for ground units. You must select the shortest or fastest route for your ground units under Automatic Calculation.
Now set how you would like to calculate your ground trips under Automatic Calculation. You can choose:
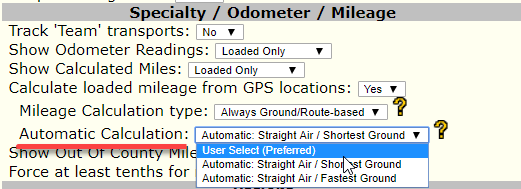
User Select (Preferred). The users will be prompted to confirm or modify the calculate mileage based on the Mileage Calculation type.
Straight Air / Shortest Ground. For ground transport, emsCharts will automatically calculate the shortest route (in miles) based on Google Maps.
Straight Air / Fastest Ground. For ground transport, emsCharts will automatically calculate the fastest route (in miles), taking into account traffic, based on Google Maps.
Remember to save the adjustments you made for the Chart. And enjoy using Geocoding to calculate mileage!
In addition to base sites, you can geocode your common addresses, which increases the accuracy of mileage calculations as well as speeds up how long it takes to complete a PCR.
Note: the coordinates of hospitals are brought over from the hospital database emsCharts uses. |
To geocode your common addresses:
Go to Configuration under Service and then click the Code Tables tab.
Click in the Code Table drop-down and type Common Addresses.
Select the Common Addresses code table.
Click on the first location in the list.
Make sure the full address for the address is correct.
Scroll to the bottom.
Click the Re-Geocode link to obtain GPS coordinates for this address.

Evaluate the precision of the results under Precision. The precision of the example below is ZIP.

ZIP means the GPS coordinates returned are those of the center of the zip code. Ideally, precision should be address, which means that geocoding found the exact location. Any other precision will describe the accuracy of the returned results.
Once GPS coordinates have been found, you can view them on a map by clicking the Map link.

Finish geocoding all of your common addresses following these instructions.
Now that you’ve set up Bio-Surveillance and other Geocoding features, we’ll show how they impact PCRs.
Once Geocoding is enabled, boxes to track the referring and receiving GPS coordinates will appear on page 1:
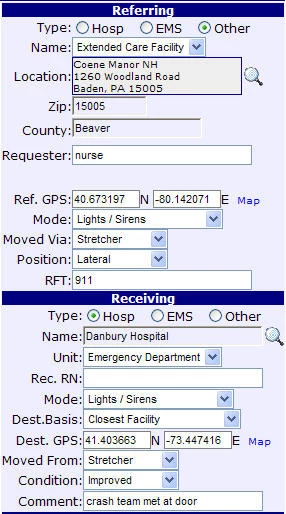
If a location that has been previously geocoded is selected, then these coordinates will be automatically filled in.
If a new address is entered, then emsCharts will attempt to geocode the address, a process which usually takes a few seconds.
If the address can be geocoded, then the GPS coordinates will be automatically filled in. Otherwise, a warning message will appear to let the user know that the address could not be geocoded.
Once GPS coordinates have been entered, a Map link will appear to the right of the coordinates. Clicking on this link will allow you to view where the coordinates are on a map:
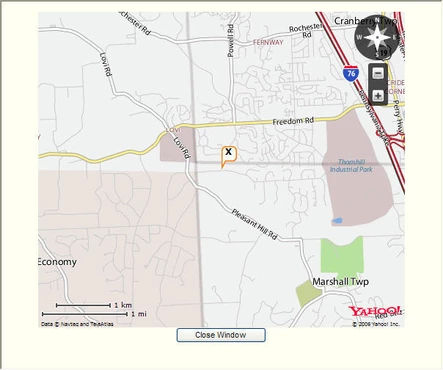
This map can be zoomed in or out in order to get more details.
To trigger Bio-Surveillance alerts and use Spatial Analysis, users will need to select the criteria you set.
Users select the Coronavirus (general) and Coronavirus (suspected) list items on page 2 under Impressions.
If you set the criteria to trigger off of symptoms, users would select them from the Symptoms drop-down on page 2.
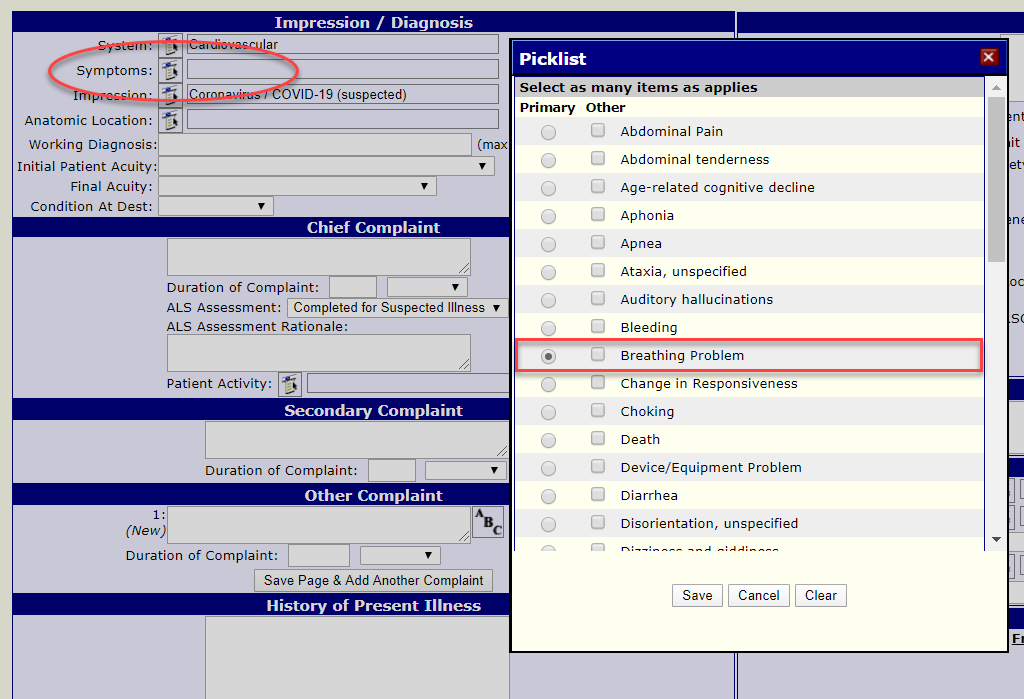
If you set the medical category to track COVID-19 visually, users would select the criteria you set from the Pt Category drop-down on page 1.
